
Repair Manual
No Heat On Maytag Dryer:
Maytag is one of the most widely recognizable manufacturers of large appliances in the world.
They have a really good reputation for making high-quality products, however, like any mechanical device, there will come a time when it breaks.
One of the most common complaints is no heat on Maytag Clothes Dryer. Below are the four most common causes for this to occur and the simple repair.
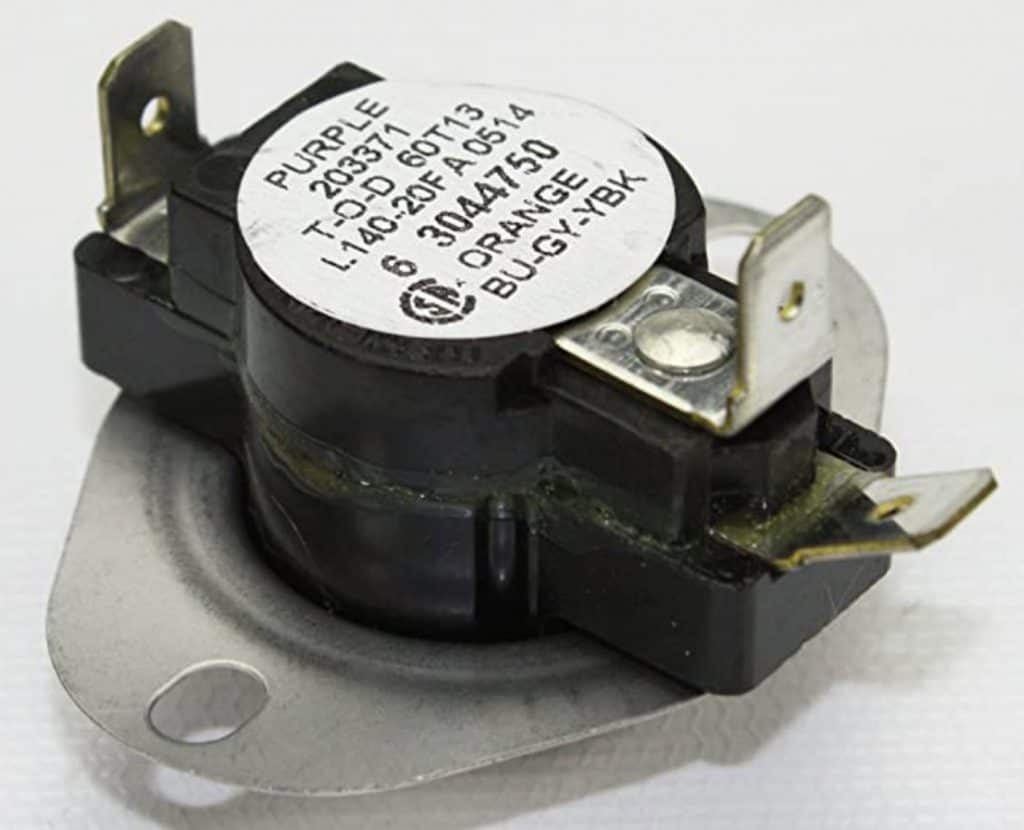
Dryer Thermal Cut-Off is blown (heater assembly)
One of the more common causes of the clothes dryer, not heating is that the Thermal Cut-off is faulty.
Fortunately, this is something that a homeowner can replace with some basic tools.
The repairs should be fairly simple for someone with some DIY skills and the right tools for the job.
To make this repair you want to first purchase the Thermal Cut-off kit for your dryer.
Follow This Link To Get a Part
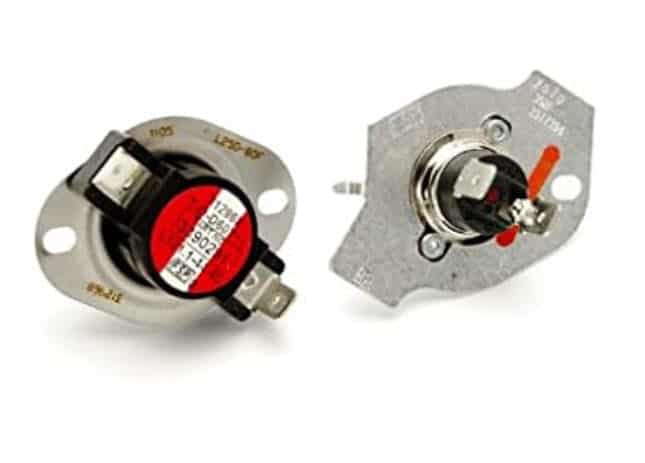
The kit comes with all of the parts that you need to complete the repair including the Thermal Cutoff and a new thermostat (it is recommended that you replace both at the same time).
The only tools you will need are a ¼” nut driver and a flat tip screwdriver.
The first thing is to is pull out the dryer so that you can get at the back of it. Unplug it from the outlet and remove the exhaust hose.
Using the nut driver to remove all of the screws on the back access cover.
The Thermal Cutoff is located at the top end of the heat shut and the thermostat is located at the bottom end.
Using a flat tip screwdriver pop off the two wires that are connected to the old Thermo Cut-off and remove the screw holding it in place.
Install the new cut-off and put the screw back in and connect the wires onto the new one.
Follow the same procedure to remove the old thermostat and then put the cover back on.
Plugin the power cord and hook up the exhaust hose and test the dryer.
Dryer Thermal Fuse is blown (blower wheel)
Your Maytag Clothes Dryer comes with a couple of safety features that are designed to prevent possible damage to the machine or even prevent a house fire.
One of those safety devices can easily be a cause for the dryer to be running but not getting hot.
It is called a Dryer Thermal Fuse and it is designed to shut down the heater circuit in case of an overheating condition is detected.
So, if at some point you find that the dryer timer went off and your clothes are not dry or suspect that it never heated up in the first place.
It is possible that the Dryer Thermal Fuse is likely faulty or blown completely.
In this case, the repair is fairly easy and you can order a new Thermal Fuse from Maytag and replace it yourself.
Follow This Link To Get a Part
Once you have the new fuse to replace the old one with you will only need a couple of tools; ¼” nut driver and a flat tip screwdriver.
Once you have the replacement Thermal fuse in hand you can start the repair.
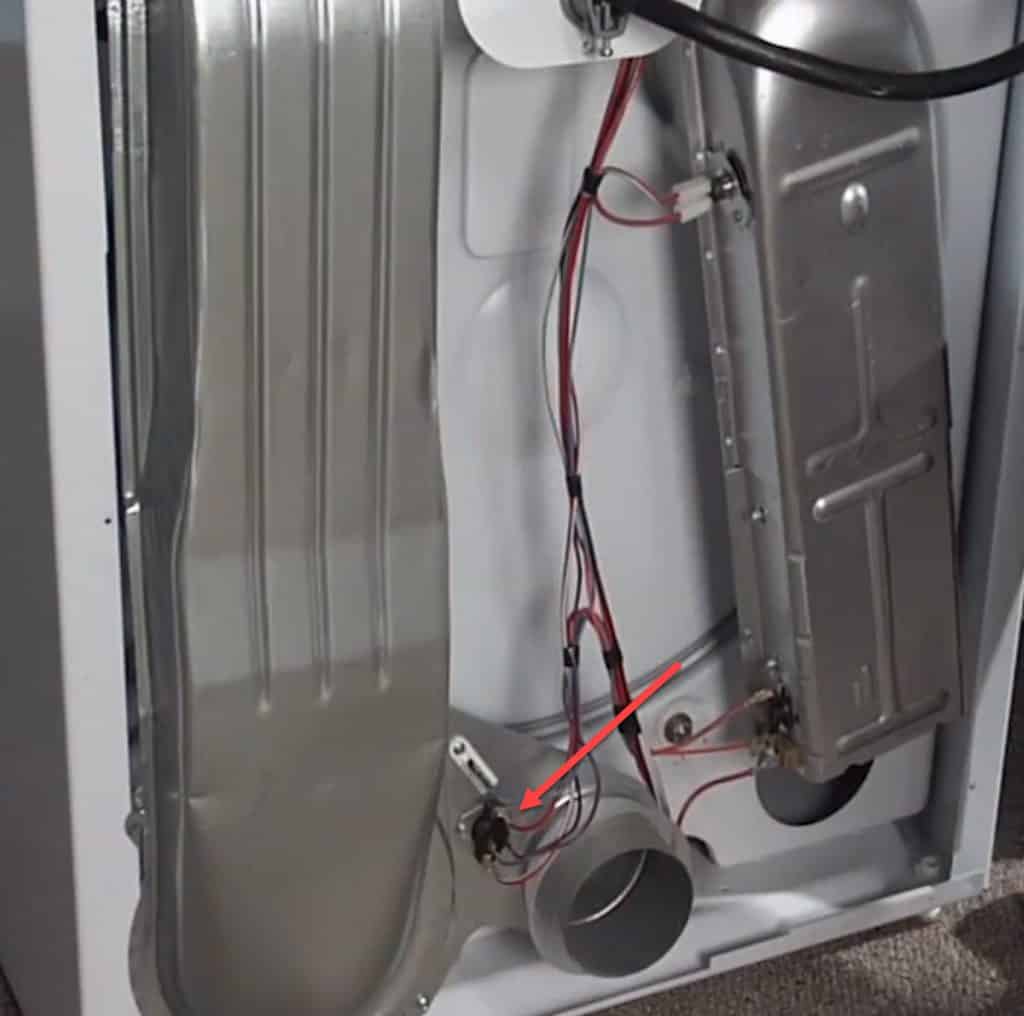
The first thing you need to do is pull the dryer away from the wall and be sure that it is unplugged and the exhaust hose is disconnected.
Once you have easy access to the back of the dryer use the ¼” nut driver to remove all of the screws from the back cover. Set it aside and locate the old Thermal fuse.
It should be located at the lower part of the dryer blower wheel. Using a flat tip screwdriver to pop off the two wires that are connected to the terminals of the old fuse.
Then using the ¼” nut driver remove the single screw that is holding it in place. Remove the old Thermal Fuse and install the new one and put the screw back in place and tighten it.
Attach the two wires on the terminals of the new fuse (it does not matter which wire you attach to which terminal).
Put the access cover back on and tighten all of the screws. Plugin the power cord to the outlet and hook up the exhaust hose and reposition the dryer. Turn it on to test and check to see if it heats up.
Dryer Heating Element is burnt
When it comes to your Maytag Clothes Dryer there are several things that can directly cause it to not heat up even if the dryer itself starts the drying cycle.
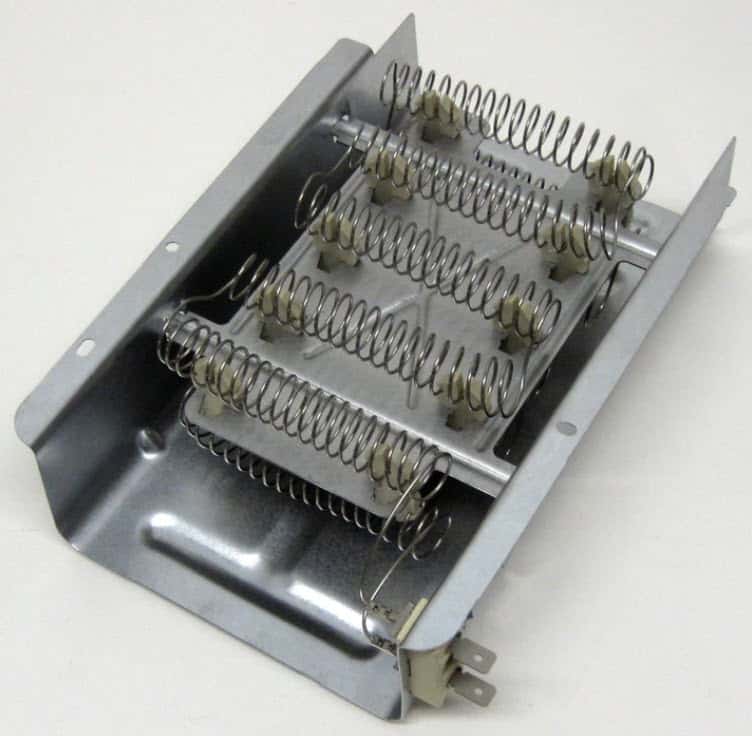
Another one of the most common reasons for the dryer not to heat up and dry the clothes in the drum is that the heating element is faulty or completely bad.
If you suspect that the heating element itself is partially or completely blown you use a multimeter and test the terminal lead for an indication of an open or shorted coils.
Follow This Link To Get a Part
If you determine that the heating element is indeed bad and needs to be replaced you can contact Maytag and request a replacement heating element.
The repair is quite simple and you can do it yourself with just a couple of tools.
Once you have received the replacement heating element the repair shouldn’t take but just a little while to accomplish.
First, be sure that the machine is unplugged from the outlet and the exhaust hose is disconnected.
Pull the unit out so that you have plenty to room to get at the back access panel.
Using the ¼” nut driver to remove all of the screws that are holding the large and small access covers and set them aside.
Locate the heating element unit at the bottom of the dryer. Disconnect the wires using the flat tip screwdriver and then remove the two screws that are holding the heating element in place.
With the screws removed pull down on the heating element unit and completely remove it from the dryer.
You will need to remove the thermostat from the old heating element and install it on the new one.
To do this remove the single screw that is holding the thermostat in place and remove it.
Place the thermostat in the same location on the new one and tighten the screw back in.
Reconnect all of the wires that you disconnected on the new heating element.
Put the two access covers back on and tighten all of the screws that are used to hold the covers in place.
Be sure to plug the power cord back into the outlet and reattach the exhaust hose to the outside vent. Test the dryer to be sure that it starts heating up like it is supposed to do.
Hi-Limit Thermostat failed
The last of the common causes is that the Hi-Limit Thermostat is not working anymore.
If the Hi-Limit Thermostat fails it will not allow the heating element to turn on and there will be no heat to force into the dryer to dry your clothes.
Follow This Link To Get a Part
To determine if the Hi-Limit Thermostat you can test it with a multimeter to check for an open condition. If you need to replace the thermostat you can contact Maytag.
Once you have the new Hi-Limit Thermostat in hand the replacement is really easy to accomplish.
You will only need a couple of tools; ¼” nut driver and a flat tip screwdriver.
The first thing you want to do is unplug the power cord from the outlet and disconnect the exhaust hose.
Pull the dryer away from the wall so that you have free access to the back access panel.
You will need to use the ¼” nut driver to remove all of the screws that are holding the two access covers that you will need to remove.
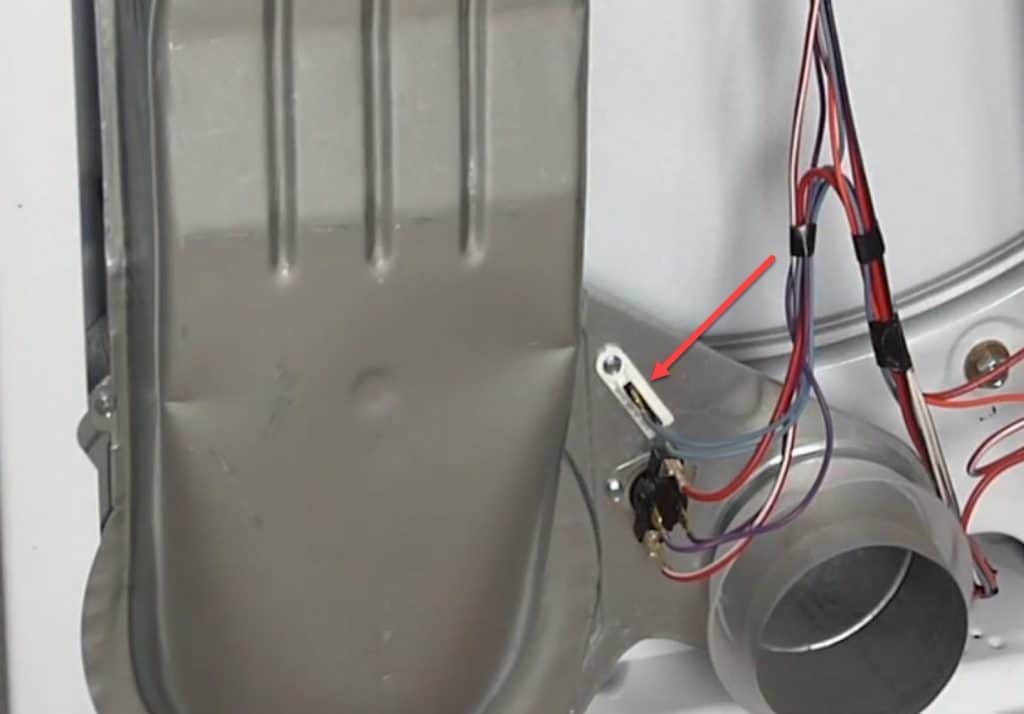
Once you have the covers off you will need to locate the old Hi-Limit Thermostat which is mounted on the heating element unit at the bottom of the dryer.
You will need to disconnect the two wires that are connected to the thermostat using the flat tip screwdriver.
Then, using the ¼” nut driver remove the screw holding the thermostat in place.
Remove the old thermostat and set it aside and install the new one. After tightening the mounting screw on the thermostat you need to hook the two wires back onto the thermostat.
The last thing you need to do is to put the access covers on and tighten all of the screws. Plug the cord into the outlet and hook up the exhaust hose and put the dryer back into its normal place and test.
Maytag is one of the most widely recognizable manufacturers of large appliances in the world.
They have a really good reputation for making high-quality products, however, like any mechanical device, there will come a time when it breaks.
One of the most common complaints is no heat on Maytag Clothes Dryer. Below are the four most common causes for this to occur and the simple repair.
Dryer Thermal Cut-Off is blown (heater assembly)
One of the more common causes of the clothes dryer, not heating is that the Thermal Cut-off is faulty.
Fortunately, this is something that a homeowner can replace with some basic tools.
The repairs should be fairly simple for someone with some DIY skills and the right tools for the job.
To make this repair you want to first purchase the Thermal Cut-off kit for your dryer.
Follow This Link To Get a Part
The kit comes with all of the parts that you need to complete the repair including the Thermal Cutoff and a new thermostat (it is recommended that you replace both at the same time).
The only tools you will need are a ¼” nut driver and a flat tip screwdriver.
The first thing is to is pull out the dryer so that you can get at the back of it. Unplug it from the outlet and remove the exhaust hose.
Using the nut driver to remove all of the screws on the back access cover.
The Thermal Cutoff is located at the top end of the heat shut and the thermostat is located at the bottom end.
Using a flat tip screwdriver pop off the two wires that are connected to the old Thermo Cut-off and remove the screw holding it in place.
Install the new cut-off and put the screw back in and connect the wires onto the new one.
Follow the same procedure to remove the old thermostat and then put the cover back on.
Plugin the power cord and hook up the exhaust hose and test the dryer.
Dryer Thermal Fuse is blown (blower wheel)
Your Maytag Clothes Dryer comes with a couple of safety features that are designed to prevent possible damage to the machine or even prevent a house fire.
One of those safety devices can easily be a cause for the dryer to be running but not getting hot.
It is called a Dryer Thermal Fuse and it is designed to shut down the heater circuit in case of an overheating condition is detected.
So, if at some point you find that the dryer timer went off and your clothes are not dry or suspect that it never heated up in the first place.
It is possible that the Dryer Thermal Fuse is likely faulty or blown completely.
In this case, the repair is fairly easy and you can order a new Thermal Fuse from Maytag and replace it yourself.
Follow This Link To Get a Part
Once you have the new fuse to replace the old one with you will only need a couple of tools; ¼” nut driver and a flat tip screwdriver.
Once you have the replacement Thermal fuse in hand you can start the repair.
The first thing you need to do is pull the dryer away from the wall and be sure that it is unplugged and the exhaust hose is disconnected.
Once you have easy access to the back of the dryer use the ¼” nut driver to remove all of the screws from the back cover. Set it aside and locate the old Thermal fuse.
It should be located at the lower part of the dryer blower wheel. Using a flat tip screwdriver to pop off the two wires that are connected to the terminals of the old fuse.
Then using the ¼” nut driver remove the single screw that is holding it in place. Remove the old Thermal Fuse and install the new one and put the screw back in place and tighten it.
Attach the two wires on the terminals of the new fuse (it does not matter which wire you attach to which terminal).
Put the access cover back on and tighten all of the screws. Plugin the power cord to the outlet and hook up the exhaust hose and reposition the dryer. Turn it on to test and check to see if it heats up.
Dryer Heating Element is burnt
When it comes to your Maytag Clothes Dryer there are several things that can directly cause it to not heat up even if the dryer itself starts the drying cycle.
Another one of the most common reasons for the dryer not to heat up and dry the clothes in the drum is that the heating element is faulty or completely bad.
If you suspect that the heating element itself is partially or completely blown you use a multimeter and test the terminal lead for an indication of an open or shorted coils.
Follow This Link To Get a Part
If you determine that the heating element is indeed bad and needs to be replaced you can contact Maytag and request a replacement heating element.
The repair is quite simple and you can do it yourself with just a couple of tools.
Once you have received the replacement heating element the repair shouldn’t take but just a little while to accomplish.
First, be sure that the machine is unplugged from the outlet and the exhaust hose is disconnected.
Pull the unit out so that you have plenty to room to get at the back access panel.
Using the ¼” nut driver to remove all of the screws that are holding the large and small access covers and set them aside.
Locate the heating element unit at the bottom of the dryer. Disconnect the wires using the flat tip screwdriver and then remove the two screws that are holding the heating element in place.
With the screws removed pull down on the heating element unit and completely remove it from the dryer.
You will need to remove the thermostat from the old heating element and install it on the new one.
To do this remove the single screw that is holding the thermostat in place and remove it.
Place the thermostat in the same location on the new one and tighten the screw back in.
Reconnect all of the wires that you disconnected on the new heating element.
Put the two access covers back on and tighten all of the screws that are used to hold the covers in place.
Be sure to plug the power cord back into the outlet and reattach the exhaust hose to the outside vent. Test the dryer to be sure that it starts heating up like it is supposed to do.
Hi-Limit Thermostat failed
The last of the common causes is that the Hi-Limit Thermostat is not working anymore.
If the Hi-Limit Thermostat fails it will not allow the heating element to turn on and there will be no heat to force into the dryer to dry your clothes.
Follow This Link To Get a Part
To determine if the Hi-Limit Thermostat you can test it with a multimeter to check for an open condition. If you need to replace the thermostat you can contact Maytag.
Once you have the new Hi-Limit Thermostat in hand the replacement is really easy to accomplish.
You will only need a couple of tools; ¼” nut driver and a flat tip screwdriver.
The first thing you want to do is unplug the power cord from the outlet and disconnect the exhaust hose.
Pull the dryer away from the wall so that you have free access to the back access panel.
You will need to use the ¼” nut driver to remove all of the screws that are holding the two access covers that you will need to remove.
Once you have the covers off you will need to locate the old Hi-Limit Thermostat which is mounted on the heating element unit at the bottom of the dryer.
You will need to disconnect the two wires that are connected to the thermostat using the flat tip screwdriver.
Then, using the ¼” nut driver remove the screw holding the thermostat in place.
Remove the old thermostat and set it aside and install the new one. After tightening the mounting screw on the thermostat you need to hook the two wires back onto the thermostat.
The last thing you need to do is to put the access covers on and tighten all of the screws. Plug the cord into the outlet and hook up the exhaust hose and put the dryer back into its normal place and test.
-

 Refrigerator Repair2 months ago
How To Reset Samsung Refrigerator Control Panel? 3 Easy Steps
-
 Repair Manual2 months ago
Why Amana Washer Stuck on Final Spin?
-
 Repair Manual2 months ago
3 Ways How to Check for Carbon Monoxide Without a Detector?
-

 Repair Manual3 months ago
GE Washer Code 26 – Troubleshooting Guide
-

 Repair Manual2 months ago
Amana Washer Code E3 – Troubleshooting Guide
-

 Repair Manual2 months ago
Maytag Washer Code LF – Troubleshooting Guide
-

 Repair Manual2 months ago
iRobot Roomba Can’t Connect To WiFi – Troubleshooting Guide
-

 Dryer Repair2 months ago
Common Dryer Air Flow Problems You Need To Know About